Welcome
Version 1.0alpha

ArmorPaint is a stand-alone software designed for physically-based texture painting. Drag & drop your 3D models and start painting. Receive instant visual feedback in the viewport as you paint.
The alpha version has many rough edges and the experience may be frustrating.
Download
Windows (10 or newer), Linux or macOS (apple silicion) is recommended. Experimental iOS and Android builds are also provided. On desktop, ArmorPaint is a portable application with no installation - just unpack and run.
Requirements
Painting process in ArmorPaint runs on the GPU and the performance mainly depends on a graphics card. Minimum for 4K painting is an Intel HD4000 graphics card. For 16K painting, Nvidia RTX 2080/8GB or better is recommended.
See Preferences to tune performance.
Updating
Latest builds can be downloaded through your Itch Library or Gumroad Library. Learn more here.
In ArmorPaint, press
Help - Check for Updates...to check if newer build is available.
Get Started
Windows
Unpack downloaded archive and run ArmorPaint.exe. In some cases, Windows may prompt you with the unrecognized app dialog - press More Info - Run Anyway.
Linux
Unpack downloaded archive and run ArmorPaint. In some cases, you may need to open terminal in the extracted folder and run ./ArmorPaint.
macOS
Unpack downloaded archive and run ArmorPaint.app.
iOS
Experimental: Available on the AppStore.
Android
Experimental: Available on Google Play.
Controls
Left mouse button / Pento paint.Alt+left mouse buttonto rotate the camera.Alt+middle mouse buttonto pan the camera.Alt+right mouse button/mouse wheelto zoom in and out.- Controls can be customized in
Menu bar - Edit - Preferences... - Keymap. - Default or Blender keymap preset can be selected.
- Keymap presets can be imported and exported.
Basics

Import Meshes
Drag and drop unwrapped .obj file into the viewport. This will replace the currently painted mesh. Up to ~4GB .obj files are supported. .fbx, .blend, .stl, .gltf and .glb files are also supported.
In the Import Mesh dialog:
- Set
Split Bycombo toUDIM Tileto parse imported.objmesh into UDIM tiles. - Enable
Apply Skinningto load and apply animation frame from.fbxor.glbfile.
Modifying imported mesh data:
- Normals can be re-calculated with
Meshes tab - Edit - Calculate Normals. - Up axis can be set with
Meshes tab - Edit - Rotate. - Geometry can be re-centered with
Meshes tab - Edit - Geometry to Origin. - Height output can be applied to geometry with
Meshes tab - Edit - Apply Displacement. - UV map can be auto-generated with
Meshes tab - Edit - UV Unwrap. - Keep in mind that if you modify UV map of the imported mesh, you will have to also export the modified mesh back out of ArmorPaint alongside the painted textures so they can be UV mapped properly.
- Press
Meshes tab - Edit - Edit UV Mapto open a basic built-in UV map editor. - Press
Meshes tab - Edit - Modifiersto applyDecimate,Smooth,SubdivideorBevel.
You can get sample assets for testing in the ArmorPaint cloud.
See
Menu bar - Preferences... - Pluginsto enable support for additional mesh formats.
Import Materials
Drag and drop a folder with PBR texture set onto the viewport. ArmorPaint will recognize the file extensions and create a new material from imported textures. Multiple folders can be dropped at once.
Click on the Materials tab - Import button to import materials from ArmorPaint .arm files.
You can get starter content in the ArmorPaint Cloud.
Import Textures
Drag and drop .jpg, .png, .tga, .bmp, .gif, .psd, .hdr, .svg, .exr (uncompressed only) or .tif images into the node editor. This will import the image and place a new Image node onto the canvas.
See
Menu bar - Preferences... - Pluginsto enable support for additional image formats.
Export Textures
Click on the Menu bar - File - Export - Textures... button.
Resolution: Set resolution for exported textures.Color: Set8bit,16bitor32bitcolor depth.Format:.pngor.jpg(for8bitcolor),.exr(for16bit / 32bitcolor).Layers: Export all visible layers or selected layers only into textures.Preset: Select a pre-configured preset or build a custom one.Genericpreset exports individual PBR textures.Unrealpreset exports packed occlusion-roughness-metallic texture.Unitypreset exports packed metallic-occlusion-smoothness texture.Minecraftpreset exports packed metallic-emission-roughness texture.base_colorpreset exports only the base color texture.specularpreset exports diffuse and specular textures.Destination: Export textures to disk or pack into the project file atTextures tab.Padding: Apply additional padding to UV map borders to prevent seams.
Configure custom channel swizzling for exported textures in Presets tab:
- Select an existing preset you wish to edit or press
New. - Press
Importto import preset from.jsonfile. - Press
Addto create new texture slot. - Configure
RGBAchannels for each texture slot. - Right-click on texture name and press
Deleteto delete texture slot. .jsonfile for each preset is located in theArmorPaint/data/presetsfolder.

Create object groups in Atlases tab:
- Assign atlas number to objects
- Multiple objects can share a single material via altas
- One texture set per atlas is written during texture export
Export Mesh
Click on the Menu bar - File - Export - Mesh... button to save the currently loaded mesh into .obj or .glb file. This is handy when you want to export the sculpted mesh or the mesh has been unwrapped / modified in ArmorPaint.
Save / Load Project
Click on the Menu bar - File - Save button (Ctrl + S) to save the currently opened project. Mesh, layers, materials and brushes will be saved into .arm project file.
Enable Menu bar - File - Pack Assets option to pack all external assets like textures into the .arm file during project save.
To open the project file, drag and drop .arm file onto the viewport. .arm files can also be set to open directly with ArmorPaint executable from the OS file explorer.
.obj and other asset types can also be associated if you wish to use ArmorPaint as a model / texture viewer.
If the mesh file was modified after it was already imported in ArmorPaint, you can use Menu bar - File - Reimport Mesh / Reimport Textures buttons to reload assets.
Browser
Click on the Status bar - Browser tab to activate the built-in asset browser.
- Click on the
Cloudbutton to access the ArmorPaint cloud. - Drag assets from browser into the viewport to import.
- For
.armmaterials, preview icons are displayed. - Click on the
+button to save the current path into bookmarks panel. - Press
ctrl+fkeys to activate search in the current folder. - Use arrow keys, enter / backspace to navigate.

Tools

Brush

Select Brush(B) tool from toolbar. Configure brush parameters in the header. Use left mouse button / pen to paint strokes using the selected material.
Radius: Brush size. (HoldFkey and move the cursor)UV Scale: Scale the coords for currently painted material.Angle: Rotate the coords for currently painted material.Opacity: Overall opacity of the brush stroke. (HoldShift+Fkey and move the cursor)Hardness: Fade opacity towards the brush stroke edge.Blending: Blending mode used for painting.TexCoord: Coordinates used for texture sampling. MeshUV Map,Projectfrom view orTriplanarmapping.X-Ray: Paint through mesh faces.Symmetry: Mirror brush strokes on the X, Y and/or Z axis.
Hold brush ruler key (SHIFT) when painting to restrict strokes horizontally or vertically. Hold brush ruler key (SHIFT) and click onto the surface to paint lines. Hold x key to snap brush strokes to a grid.
Eraser

Select Eraser(E) tool from toolbar. Use left mouse button / pen to erase strokes on the currently selected layer.
Radius: Eraser size.Opacity: Overall opacity of the eraser stroke.Hardness: Fade opacity towards the eraser stroke edge.X-Ray: Erase through mesh faces.Symmetry: Mirror eraser strokes on the X, Y and/or Z axis.
Fill

Select Fill(G) tool from toolbar. Press left mouse button / pen to fill active layer with selected material. Fill tool respects active object mask, material mask and color id mask.
UV Scale: Scale the coords for currently painted material.Angle: Rotate the coords for currently painted material.Opacity: Overall opacity of the fill effect.Blending: Blending mode used for fill effect.TexCoord: Coordinates used for texture sampling. MeshUV Map,Projectfrom view orTriplanarmapping.Fill Mode: Allows to fill individual mesh faces (Facemode), fill all faces based onAngleor fill the currentUV Island.
Decal

Select Decal(D) tool from toolbar. Press left mouse button / pen to apply active material as a decal onto the surface.
Radius: Decal size.Scale X: Scale decal size horizontally.UV Scale: Scale the coords for currently painted material.Angle: Rotate the coords for currently painted material.Opacity: Overall opacity of the decal.Blending: Blending mode used for applying decal.X-Ray: Apply decal through mesh faces.Symmetry: Mirror decal on the X, Y and/or Z axis.
Hold z key to align decal to the camera view, instead of snapping it alongside the mesh normal. Hold ctrl key to use decal as a stencil mask.
Text

Select Text(T) tool from toolbar. Press left mouse button / pen to apply active material as a text onto the surface. Drag and drop a .ttf file into the viewport to change the font.
Radius: Text size.UV Scale: Scale the coords for currently painted material.Angle: Rotate the coords for currently painted material.Opacity: Overall opacity of the text.Blending: Blending mode used for applying text.Font: Select which font to apply.Text: Type a text to apply.X-Ray: Apply text through mesh faces.Symmetry: Mirror text on the X, Y and/or Z axis.
See
Fonts tabto manage imported fonts. Click2D Viewto preview the font.
Clone

Select Clone(L) tool from toolbar. Hold ALT to set clone source location. Use left mouse button / pen to clone the material from source location to active location.
Radius: Brush size.Opacity: Overall opacity of the brush stroke.Blending: Blending mode used for painting.X-Ray: Paint through mesh faces.Symmetry: Mirror brush strokes on the X, Y and/or Z axis.
Blur

Select Blur(U) tool from toolbar. Use left mouse button / pen to blur the material applied to the surface.
Radius: Brush size.Opacity: Overall opacity of the brush stroke.Blending: Blending mode used for painting.Blur type:BlurorSmudgeto smear.X-Ray: Paint through mesh faces.Symmetry: Mirror brush strokes on the X, Y and/or Z axis.
Particle

Select Particle(P) tool from toolbar. Use left mouse button / pen to apply particles onto the surface.
Radius: Particle emitter size.Opacity: Overall opacity of the emitted particle.Hardness: Fade opacity towards the particle edge.Blending: Blending mode used for applying particles.Particle: Tweak individual particle properties likeLifetime,Distance,Mass,Random,Friction,BounceandGravity.X-Ray: Apply particles through mesh faces.Symmetry: Mirror particles on the X, Y and/or Z axis.
Color ID

Select Color ID(C) tool from toolbar. Drag and drop color-id texture onto the viewport and assign it into the Color ID Map field. Afterwards, click on a model to pick a specific color. All drawing operations will now be restricted to this color. Picked color can be removed with a Clear button.
To Mask: Selected color id will be added as a mask of the active layer.Viewport Mask: Only mesh faces belonging to the selected color id will be visible.
Picker

Select Picker(V) tool from toolbar. Press left mouse button / pen in viewport to read material values from the surface. Base color, normal, occlusion, roughness and metallic values will be displayed in the header.
Add Swatch: Adds picked values to theSwatches tab.Select Material: When enabled, the material you pick from the mesh surface will also get auto-selected in theMaterials tab.Paint Mask: All drawing operations will be restricted to the surface where picked material is painted.Viewport Mask: Only mesh faces belonging to the picked material will be visible.
Material

Select Material tool from toolbar. A live material preview will be displayed in the viewport, allowing for easier material creation.
Cursor

Select Cursor(r) tool from toolbar. A gizmo will appear in the viewport allowing you to adjust the transform of objects in the scene. Location, rotation and scale will be displayed in the header.
Select

Select Select(m) tool from toolbar. Press left mouse button / pen to draw a rectangular mask in the viewport. The painting operations will now be restricted to this area. Press Clear button to discard the mask.
Materials

Materials in ArmorPaint are composed with nodes. When painting, brush applies a material onto the surface. To compose a material, open node editor by clicking Materials tab - Nodes (TAB).
- Use toolbar at the top to add new nodes.
- Press
spaceto search for nodes. - Drag textures from
Textures tabor file explorer into the node editor to createImagenodes.
Material preview is displayed instantly in the Materials tab as the nodes are assembled.
Right-click onto material preview to expose material operations:
- Set which channels the material should affect.
- Create
Fill Layerfrom selected material. Duplicatematerial.Exportmaterial into.armfile.Bakematerial into textures.Deletematerial.- Select
Opacity mode:Alpha- opacity socket of theMaterial Outputnode will affect the opacity of brush stroke,Translucency- opacity of the mesh itself will be affected, use this setting to paint translucent surfaces.

translucent opacity mode
Drag and drop material into viewport or Layers tab to create a fill layer.
ArmorPaint material nodes mimick the Cycles nodes. See Cycles nodes documentation.
See list of implemented nodes.
See Import Materials.
Use
Swatches tabto save and load color sets.
Neural Nodes
All neural node processing in ArmorPaint is done locally on user device. Once AI models are downloaded, internet connection is not required. A minimum of 6GB of video memory is recommended. ArmorPaint uses models published under open source licenses.
Neural nodes are available on Windows (Vulkan), Linux (Vulkan) and macOS (Metal).
Currently supported models:
- FLUX 2 klein (4gb gpu memory) -
Text to Image,Edit Image - DA3MONO (6gb gpu memory) -
Image to PBR - Real-ESRGAN (1gb gpu memory) -
Upscale Image - Hunyuan3D (12gb gpu memory, Windows-only) -
Image to 3D Mesh - Qwen (16gb gpu memory) -
Console
Neural node processing is based on the open-source iris.c library.
Setup

Navigate to the Menu bar - Edit - Preferences... - Neural tab. Pick desired model and click the Download button. Once the download is completed, neural node in the material editor is ready to be used.
Press Run on the neural node to process it. Once finished, double click on node header or click the eye icon to preview the node output.
Right-click onto the node and press Capture Output to save the node output into the Textures tab.
Edit Image Node

Edit image connected to the color input by describing the changes via text prompt or raising the Variance slider. Make the image seamless by enabling the Tile option.
Paint a mask in the viewport and connect it to the mask input. If mask is connected the node outputs a texture where mask area is filled with new content.
Image to PBR Node

Extract base color, occlusion, roughness, normal map and height from color input. A photo image is expected as a color input.
Text to Image Node

Generate an image described via text prompt. Make the image seamless by enabling the Tile option.
Upscale Image Node

Upscales color input by a factor of 4.
Photo to Material
Utilize a combination of neural nodes to create a new 4K PBR material.

To preview the material, create a new project and select the highly tessellated plane_2048 or sphere_2048 template. Fill the material onto the layer and press Meshes tab - Edit - Apply Displacement to apply height channel onto the mesh.

Brushes

Brushes in ArmorPaint are composed with nodes. When painting, brush nodes are evaluated for each painted stroke. To compose a brush, open node editor by clicking Brushes tab - Nodes (TAB).
- Use toolbar at the top to add new nodes.
- Press
spaceto search for nodes. - Drag textures from
Textures tabor file explorer into the node editor to createImagenodes.
Brush preview is displayed instantly in the Brushes tab as the nodes are assembled.
Right-click onto brush preview to expose brush operations:
- Duplicate brush.
- Export brush into
.armfile. - Delete brush.
Brushes can be imported from
.armfiles by clickingBrushes tab - Import.
Brush Mask
To use image as a brush mask:
- Drag and drop brush mask image into the node editor.
- Connect newly placed
Image Texturenode to theBrush Output - Opacitysocket.
Brush Jitter
- Connect
Randombrush node withBrush Outputsockets to jitter desired properties.
Lazy Mouse
- Raise
Lazy Radiusvalue of theInputbrush node to make the paint cursor follow the mouse in delay. This can be useful to paint smooth strokes. - Raise
Lazy Stepvalue of theInputbrush node to paint strokes in steps.
Directional Brush
- By enabling the
Directionvalue of theBrush Outputnode, painted strokes will follow the brush path. Decal and brush mask will be oriented to match the direction of a brush.
Brush Stencil
To use image as a brush stencil:
- Drag and drop stencil image into the node editor.
- Connect newly placed
Image Texturenode to theBrush Output - Stencilsocket. - Hold
ctrl(stencil_transform) key to show transform controls. - Hold
z(stencil_hide) key to make stencil invisible while still taking effect.
See list of implemented nodes.
Layers

To create a new layer, press Layers tab - New and select a layer type:
Paint Layer.Fill Layerfrom active material.Decalfrom active material.PathorCurve.Black MaskorWhite Mask.Fill Maskfrom active material.Filterto adjust the active layer with nodes.Groupcontaining active layer.
Brush will paint onto the currently selected layer.
- Layer can be parented to the specific object by setting the
Objectcombo property. This allows to utilize multiple UV maps per project - each object having it's individual UV map. - Use drag and drop to reorder layers.
- Double-click onto layer, mask or group name to rename it.
Right-click on the layer to expose layer operations:
- Set
Opacity,ResolutionandColordepth. - For fill layers, set
UV Scale,AngleandTexCoordtype. - Convert layer to
Fill LayerorPaint Layer. Exportselected layer.Mergethe layer down.Duplicatethe layer.Clearthe layer.Deletethe layer.- Set which channels the layer should affect.
- Set which UV Map to use if mesh with multiple UV maps is imported.
Right-click on the mask to expose mask operations:
- Set
OpacityandResolution. - For fill masks, set
UV Scale,AngleandTexCoordtype. - Convert mask to
Fill MaskorPaint Mask. Exportmask texture.Mergethe mask down.Duplicatethe mask.Clearthe mask.Applymask to parent layer.Deletethe mask.Invertthe mask.
Drag textures from
Textures tabinto the viewport orLayerstab to create mask for active layer.

using a path - draw straight lines with editable control points

using a curve - draw curved lines with editable control points

using a decal - project a sticker using transform controls onto a mesh

using a path layer to paint sewing

using a filter - edit parent layer using nodes
2D View

Click Layers tab - 2D View to show the channels of the selected layer. The 2D View is updated immediately as you paint.
- Paint tools are usable directly inside the 2D view.
- Press
Textures tab - 2D Viewto show selected image inside 2D view.
In the 2D View top bar:
- Show the selected layer or all visible layers.
- Select which channel to show.
- Set the zoom level.
- Display UV map as a wireframe.
- Tile the texture.
- Enable
grid snapduring painting. - Show grid.
- Capture 2D view output into the
Textures tab.
Viewport

Set viewport parameters in Menu bar - Viewport.
- Enable
Distract Free(F11) mode. Toggle Fullscreen(alt+enter) mode.- Set
Environmentintensity and angle. - Enable
Split Viewfor side-by-side viewports. - Enable
Cull Backfacesto skip drawing backward facing polygons. - Show
Wireframein the viewport. - Enable
Texelsto visualize texture pixels in the viewport with a checker pattern. - Show 3D
Compassin the viewport. - Enable
Envmapto draw environment map in the viewport. - Enable
Blur Envmapto use blurred version of the environment map. - Enable
Envmap Spheresto draw reflection balls in the viewport. - Press
Reset Envmapto replace currently imported environment map with the default one. - Press
Capture Screenshotto capture viewport output into theTextures tab.
Drag and drop a
.hdrfile onto the viewport to change the environment map.Hold
Ctrl+middle mouse buttonto rotate environment map.To simulate pixel-art like painting, disable
Filter Texturesoption and setSuper Samplein preferences to0.25x.

Viewport Mode
Set viewport render mode in Menu bar - Mode.
- Pick
Litto draw viewport with applied lighting using the rasterizer. - Pick specific channel to visualize it with no applied lighting.
- Pick
Path Tracedto draw viewport with interactive path-tracer. (on DirectX / Vulkan raytracing GPUs and Metal devices*)
Path Traced Viewport
- Available on GPUs with DirectX (Windows) / Vulkan (Linux, Android) raytracing support.
- Available on macOS with Apple silicion.
- Available on iOS with Apple M1 or newer.
- The renderer favors performance instead of correctness.
Camera
Set camera parameters in Menu bar - Camera:
- Set specific camera viewpoint.
Orbit,Zoom InandZoom Outcamera.Resetcamera.- Set
FoV(field of view). - Set
PerspectiveorOrthographiccamera type. - Set camera mode:
Orbit- Rotate camera around the mesh.Rotate- Rotate mesh around the origin.Fly- Holdright mouse buttonand move camera freely using theWASDandQEkeys.- Set camera rotation
Pivotpoint to screenCenteror paintCursor:
Workspace
Set workspace layout in Menu bar - Workspace.

paint 3d - draw onto a 3d mesh

paint 2d - draw onto a plane

nodes - build materials

script - create plugins
Workflow
Set workflow to configure available Material Output node sockets.

pbr - all channels are available

base - restricts painting to base color and opacity, use for non-PBR projects

sculpt - enables displacement socket
Baking

Open material node editor (TAB) and add a Bake Texture node. Pick a bake mode, then click the Bake button.
For ray-traced bake modes, multiple samples (set via the Samples option) will get accumulated until the operation is complete.
The result can be further processed with nodes, or connected to the Material Output node socket to use it directly. Alternatively, right-click onto the Bake Texture node and press the Capture Output button. This will save the bake result into the Textures tab from where the texture can be exported to disk.
AO (raytracing GPUs): Bake ambient occlusion.Strength,RadiusandOffsetcan be configured.
Curvature: Bake mesh curvature.Strength,RadiusandOffsetcan be configured.
Lightmap (raytracing GPUs): Bake irradiance from the environment.
Bent Normal (raytracing GPUs): Bake the normals indicating the least occluded direction for a point.
Thickness (raytracing GPUs): Bake mesh thickness. Works similar to AO baker, but uses flipped normals.
Normal: Bake normal map from high-poly mesh.Object Normal: Bake object-space normals encoded into (0-1) range.Height: Bake height map from high-poly mesh.Derivative: Bake derivative normals from high-poly mesh. wipPosition: Bake object-space positions encoded into (0-1) range.TexCoord: Bake mesh uv map.Material ID: Bake colored material IDs.Object ID: Bake colored object IDs.Vertex Color: Bake vertex color data.
Use
AObake with smallRadiusto bakeCavity.Use
Curvaturebake to create dirt masks.

Sculpting

Press Menu bar - Workspace - Workflow - Sculpt to enter sculpt mode.
work-in-progress
Scripting

Press Plugins tab - Manager to open the plugin manager.
- Click
Importto install a new plugin from.cor.zipfile. - Click
Newto create a new hello-world plugin. - Enable desired plugins from the list.
- Right-click onto plugin name to expose plugin operations:
Exportplugin file for distribution.Editplugin in a text editor or scripts tab.Deleteplugin.- Controls for enabled plugins are displayed in the
Plugins tab. - Some plugins may not expose controls but add new import / export file formats.
Live-Link
Live-link plugins are currently in development:
Plugin Development
Plugins are written in a minimal interpreted C variant. For a basic example, see the bundled hello_world.c file located in the ArmorPaint/data/plugins folder.
Timeline wip
In the timeline tab you can:
- Control skinned meshes
- Add scripts to frames
- Create mesh and layer animations

skinned mesh
Preferences

Click Menu bar - Edit - Preferences... to show the preferences window.
Interface
Language: Set localization. See currently available translations.UI Scale: Scale up the user interface when running on high-resolution display. By default, 2X scale is applied during the first startup for high-resolution displays.Node Preview: Draw previews of material nodes inside the node editor.Wrap Mouse: Wrap mouse around view boundaries during camera control.Show Asset Names: Draw labels below each material, brush and texture icon.Touch UI: Enabled by default on iOS and Android.Splash Screen: Show recent projects list upon ArmorPaint startup.Grid Snap: Align material nodes in node editor to a grid.Experimental Features: Work-in-progress features will be exposed in the interface.- Click
Restore - Confirmbutton to revert back to default settings. - Click
Restore - Import...button to import settings from older ArmorPaint version. - Click
Reset Layoutbutton to revert all layout changes.

node previews
Theme
- Select
default(dark),darker,blackorlighttheme. - Click
Newbutton to create custom theme. - Click
Importbutton to import theme from file. - Click
Exportbutton to export theme into file. - Set
Viewport Colorto draw when environment map is hidden. - Set color and size of individual theme elements.
- Set
StraightorCurvedlink style for node connections.
Usage
Undo Steps: Set the number of undo steps to keep. Using less undo steps may improve performance when running on GPU with constrained memory.Dilate Radius: Stretch brush strokes and bake result on the uv map to prevent seams.Default Layer Resolution: Resolution of new layers.Scene Atlas Resolution: Used in path-traced mode when rendering objects with separate uv maps.Cloud Server: Address of the S3 server used byBrowser tab - Cloud.Live Material Preview: Update material preview immediately during node editing.Live Brush Preview: Show brush paint preview in the viewport and 2d view.Depth Reject / Angle Reject: Depth and angle rejection for 3D cursor.Alpha Discard: When painting, texture pixels below this opacity will get discarded.

live brush preview
Camera
Default Camera Pivot: Cursor or center.Default Camera Controls: Orbit, rotate or fly.Default Camera FoV.Camera Zoom / Rotation / Pan Speed: Intensity of camera movements.Direction to Zoom: Mouse / pen direction to perform camera zoom.Allow Upside Down Camera.
Pen
Brush Radius: When painting with a pen, pressure affects the radius of brush.Brush Hardness: Pressure affects the hardness of brush.Brush Opacity: Pressure affects the opacity of brush.Brush Angle: Pressure affects the angle of brush.Sensitivity: Manual pen pressure sensitivity control.
Pen pressure is expected to work on Windows, Linux, macOS, Android and iOS.
ArmorPaint uses
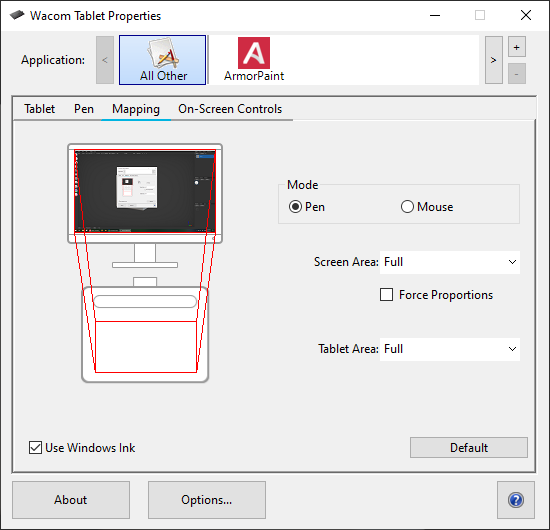
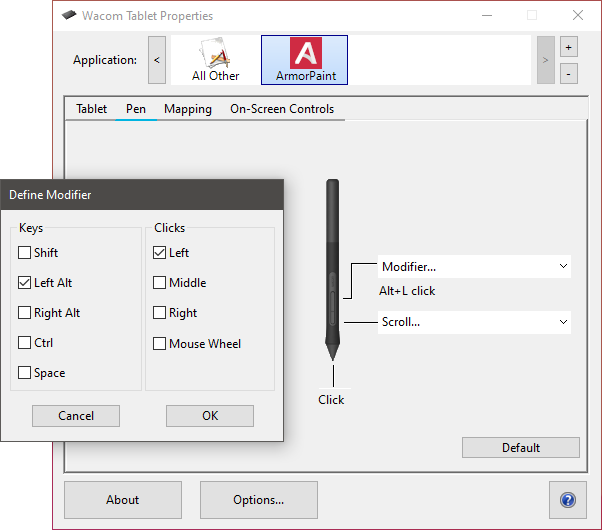
Windows InkAPI on Windows. When using a Wacom tablet, ensureUse Windows Inkoption is enabled in Wacom Tablet Properties.When using a Wacom tablet on Windows, you can rotate the viewport by assigning
Alt+Left clickmodifier onto pen button in Wacom Tablet Properties.If you are having issues with pressure detection on Linux, try installing
opentabletdriver.
Viewport
On faster GPUs:
- Raise
Super Sampleto 2X/4X for improved anti-aliasing.
On slower GPUs:
- Disable
SSAO (screen-space ambient occlusion)for improved performance.
Additional options:
- Set
Path Tracermode:Fastfor performance,Fullfor features. (raytracing GPUs) - Set clipping values with
Clip StartandClip End. - Enable
Bloom. - Set
Vignetteintensity. - Set
Noise Grainintensity. - Set
Displacement Strengthapplied by height channel in the viewport. .cube LUT: import.cubefiles for color grading.- Enable
Filter Texturesto apply linear filter when sampling textures referenced by material.
Keymap
Select an existing preset or define custom keyboard shortcuts.
- Use
left,middle,righthandles to reference mouse buttons / pen. - Use
+character to reference multiple keys: ie.ctrl+1. - Click
Importbutton to import keymap from file. - Click
Exportbutton to export keymap into file.
Neural
- Set neural node output
Resolution. Higher resolutions will consume more video memory. DownloadorDeletealready downloaded models.
FAQ

Faces are missing on the imported mesh
The missing faces are likely caused by inverted normals & backface culling. Reversing normals for the affected faces should resolve the issue.
There is also a way to disable backface culling in ArmorPaint at Menu bar - Viewport - Cull Backfaces, however it may cause issues with lighting due to normals pointing in the opposite direction.
If the issue persists, triangulating the mesh before importing it to ArmorPaint might help.
Mesh gets painted on multiple places at once
Make sure the UV map has no overlapping faces. It can be resolved by unwrapping the mesh so that each face occupies unique space on the UV map, or using multiple layers to paint objects with multiple UV sets.
Simple meshes can be unwrapped directly in ArmorPaint via Meshes tab - Edit - UV Unwrap.
Black spots appear on the imported mesh
Make sure all mesh faces are present on the UV map.
Download of neural model does not start
Check that the ArmorPaint connection is not blocked by a firewall or a software like vmware fusion.